I became interested in how a raycasting (not to be confused with raytracing) game engine works. To properly understand how it works, I implemented it from scratch, including deriving the mathematics behind it. The end result, which uses the engine in a very simple and crude game, is available on my GitHub.
I wanted to capture my journey in a tutorial-style series. In the first part we took a look at
how to render the walls. The end results looked like this
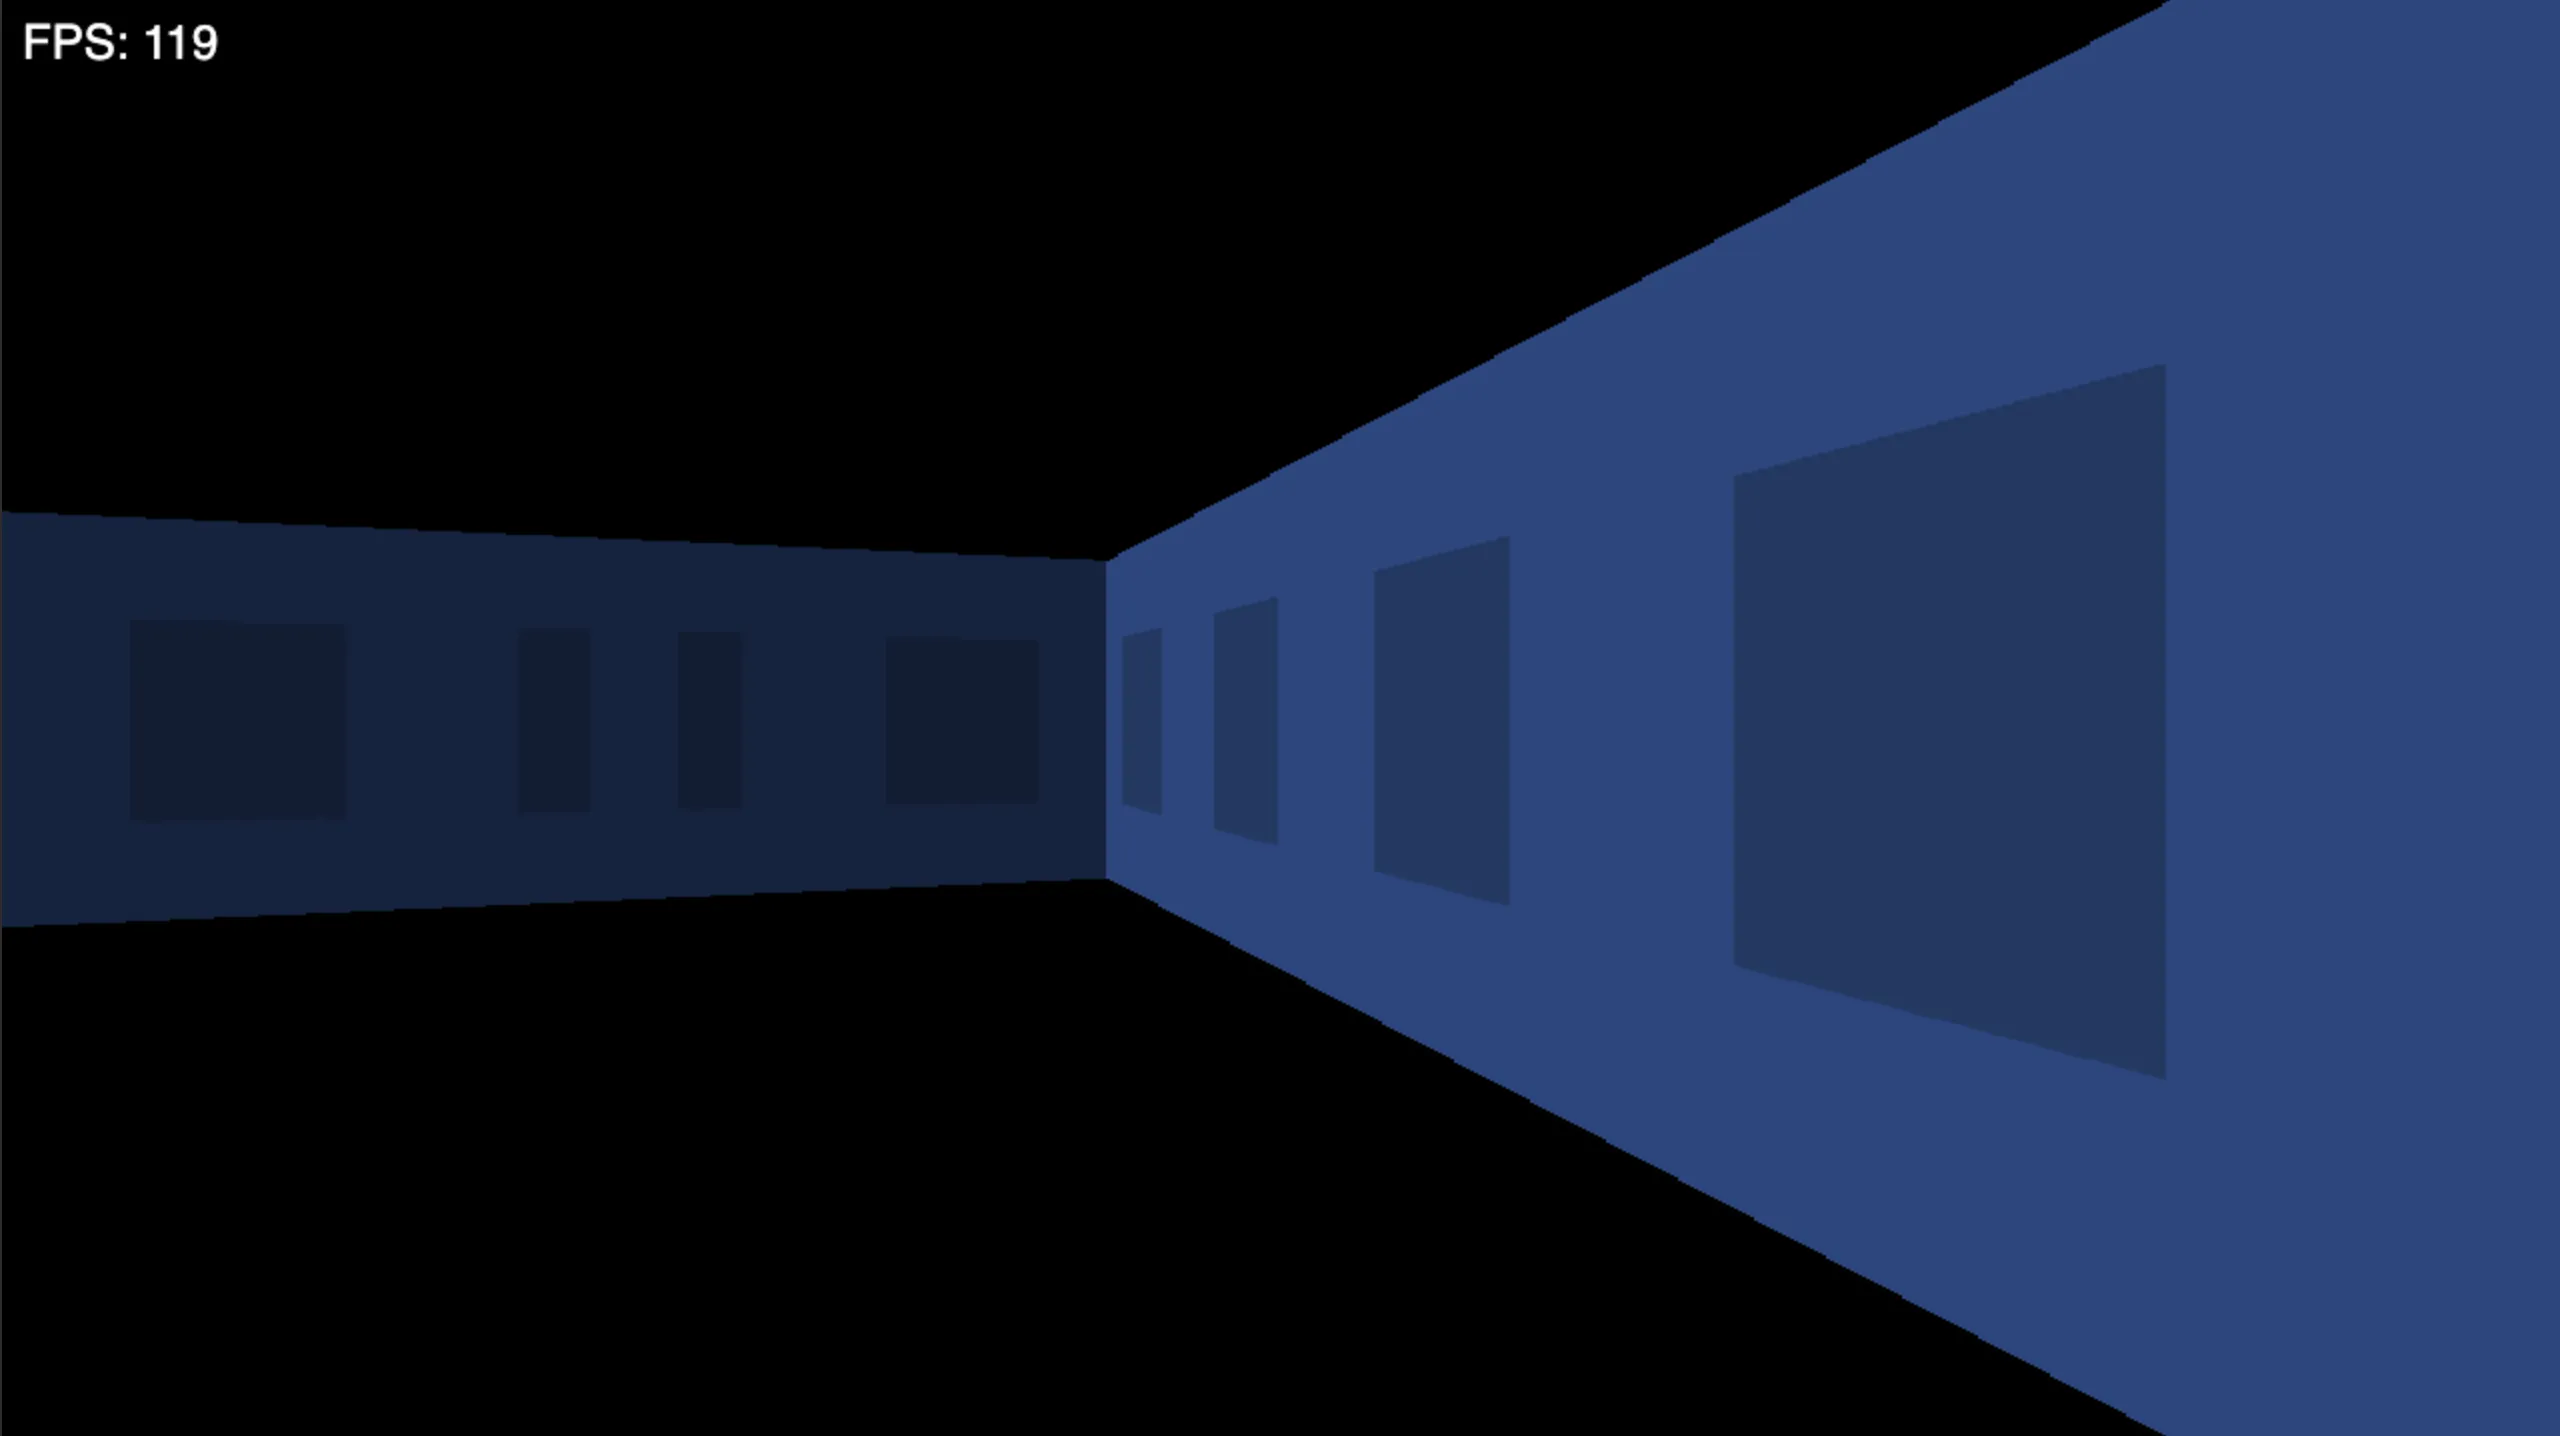
As you can see, the walls float in a black void. In this part we’ll fix that by implementing rendering of floor and ceiling.
Refresher
Let’s first refresh our memory of how the player and camera are represented. More detailed explanation is given in the first part.
The position of the player on the map is given as and rotation angle .
Vector that represents the player direction is defined as
Vector that represents the camera plane is calculated by rotating the direction vector by in the positive (counter clockwise) direction, like so
The following figure shows how direction and camera vectors are related.
Our camera plane is from to .
General Idea
With the definitions refresher out of the way, we can start deriving the math. In the first part, most of the math was derived from a top-down view. In this part, a side view will be a lot more useful.
In the image above, blue lines represent the vertical field of view for the player. When we are rendering the topmost row of the screen (screen pixel ), we are interested in which ceiling tile the top blue line hits. When we are rendering the bottom row of the screen, we are interested in which floor tile the bottom blue line hits. Other screen rows are between the two blue lines.
Before we continue, we should remember that we’re dealing with a 2D grid of tiles. There is no special ceiling/floor tile. We model the floor and ceiling as two infinite horizontal planes. In the grid, each tile can either be a wall, or empty. Just like wall tiles provide texture info for walls, empty tiles provide texture info for floor and ceiling. Wall tiles render as full-height slices, occluding any floor/ceiling behind them. So we only need to render floor/ceiling for empty tiles.
It is very convenient to notice that the camera is positioned in the middle, between the floor and the ceiling. We can compute only the ceiling tile and reuse it for the symmetric floor row. Let’s say we are rendering the ceiling for screen coordinate , where , with being the height of the screen in pixels. If tile is used for the ceiling at coordinate, we can also use it for the floor at the symmetric pixel coordinate .
Let’s look at a code snippet of the main floor/ceiling rendering loop. This will show both how we use 2D grid tiles, and how we use the symmetry for rendering floor and ceiling.
fn render_floor_ceil(game: *const Game, camera: Camera) void {
    var y: usize = 0;
    while (y < screen.height / 2) : (y += 1) {
        var x: usize = 0;
        while (x < screen.width) : (x += 1) {
            const tile_idx = compute_tile_idx(...);

            // Get floor and ceiling color
            var floor_color: Color = get_floor_color(tile_idx);
            var ceil_color: Color = get_ceil_color(tile_idx);

            // Draw floor and ceiling
            screen.draw_pixel(x, screen.height - y - 1, floor_color);
            screen.draw_pixel(x, y, ceil_color);
        }
    }
}
As you can see, the code snippet uses some functions that we have to implement. The most interesting of those being
compute_tile_idx. We’ll see that get_floor_color and get_ceil_color are quite trivial after we have compute_tile_idx.
Computing Floor & Ceiling Coordinates
In this section we’ll derive the algorithm for computing floor/ceiling tile for given screen . We’ll derive it only for the ceiling and use the observed symmetry for the floor. The method will be similar to wall rendering — we’ll be casting a ray. But instead of a 2D ray, it will be a 3D ray with a non-zero component.
For screen , where is from the top half of the screen, we construct a ray with the origin at the camera that goes through the screen at pixel position . This is shown on the following image, where represents camera direction.
We first map screen height to camera factor as
where is height of the screen in pixels. For the top row of the screen , camera factor is .
For the middle row, , camera factor is . We can construct camera factor vector as
. This is represented as green vector f on the image above.
For (leftmost pixel), ray vector is constructed as
where is player direction, and is camera plane vector. See refresher.
Ceiling is located at a fixed height that we’ll define as camera height. Camera height determines field of view, similar to camera width in the first part. You can play around with this constant for a different look, but we’ll define it as . For scalar , . We are looking for such , that . Since , we are looking for such that , which gives us
Since we are rendering only , it holds that so we won’t have problems with division by 0.
It’s worth noting that depends only on . So we have to compute it once for a given and can then reuse it for the whole row of pixels (all ).
Let’s focus back on the case where . The location of the floor/ceiling is , where is position of the player on the map. We can use the projection of that vector onto -plane as the grid location that has to be rendered as floor/ceiling. Let’s call this the tile coordinate vector , which we can define as
Note that in the projection we omit , since .
Integer part of gives us the grid indices of the tile used for floor/ceiling. Fractional part of gives us the position inside the tile, that will be useful for texturing in the next section.
We could construct a ray for each , by multiplying with an appropriate factor, and then use to get the ceiling/floor position on the grid. But that is a lot of vector math that we can avoid. Instead we’ll only calculate the leftmost position for and rightmost position for . Then we can do linear interpolation between the two positions. For floor/ceiling position is given as
With all the math out of the way, we can update the render_floor_ceil function to compute the floor/ceiling tile
position.
fn render_floor_ceil(game: *const Game, camera: Camera) void {
var y: usize = 0;
while (y < screen.height / 2) : (y += 1) {
// Camera factor and shared t parameter
const y_f = @as(f32, @floatFromInt(y));
const height_f = @as(f32, @floatFromInt(screen.height));
const camera_factor = 1.0 - 2.0 * (y_f / height_f);
const t = 1.0 / camera_factor;
// Now we can calculate the most left and right vector for the current row.
// Vectors represent position on map.
const left = game.player_pos.add(
&camera.direction.add(&camera.plane).scalar_mul(t)
);
const right = game.player_pos.add(
&camera.direction.sub(&camera.plane).scalar_mul(t)
);
const diff = right.sub(&left);
var x: usize = 0;
while (x < screen.width) : (x += 1) {
// Get position on the map for current pixel
const x_f = @as(f32, @floatFromInt(x));
const width_f = @as(f32, @floatFromInt(screen.width-1));
const step = x_f / width_f;
// Position of floor/ceiling tile.
const position = left.add(&diff.scalar_mul(step));
// ...
}
}
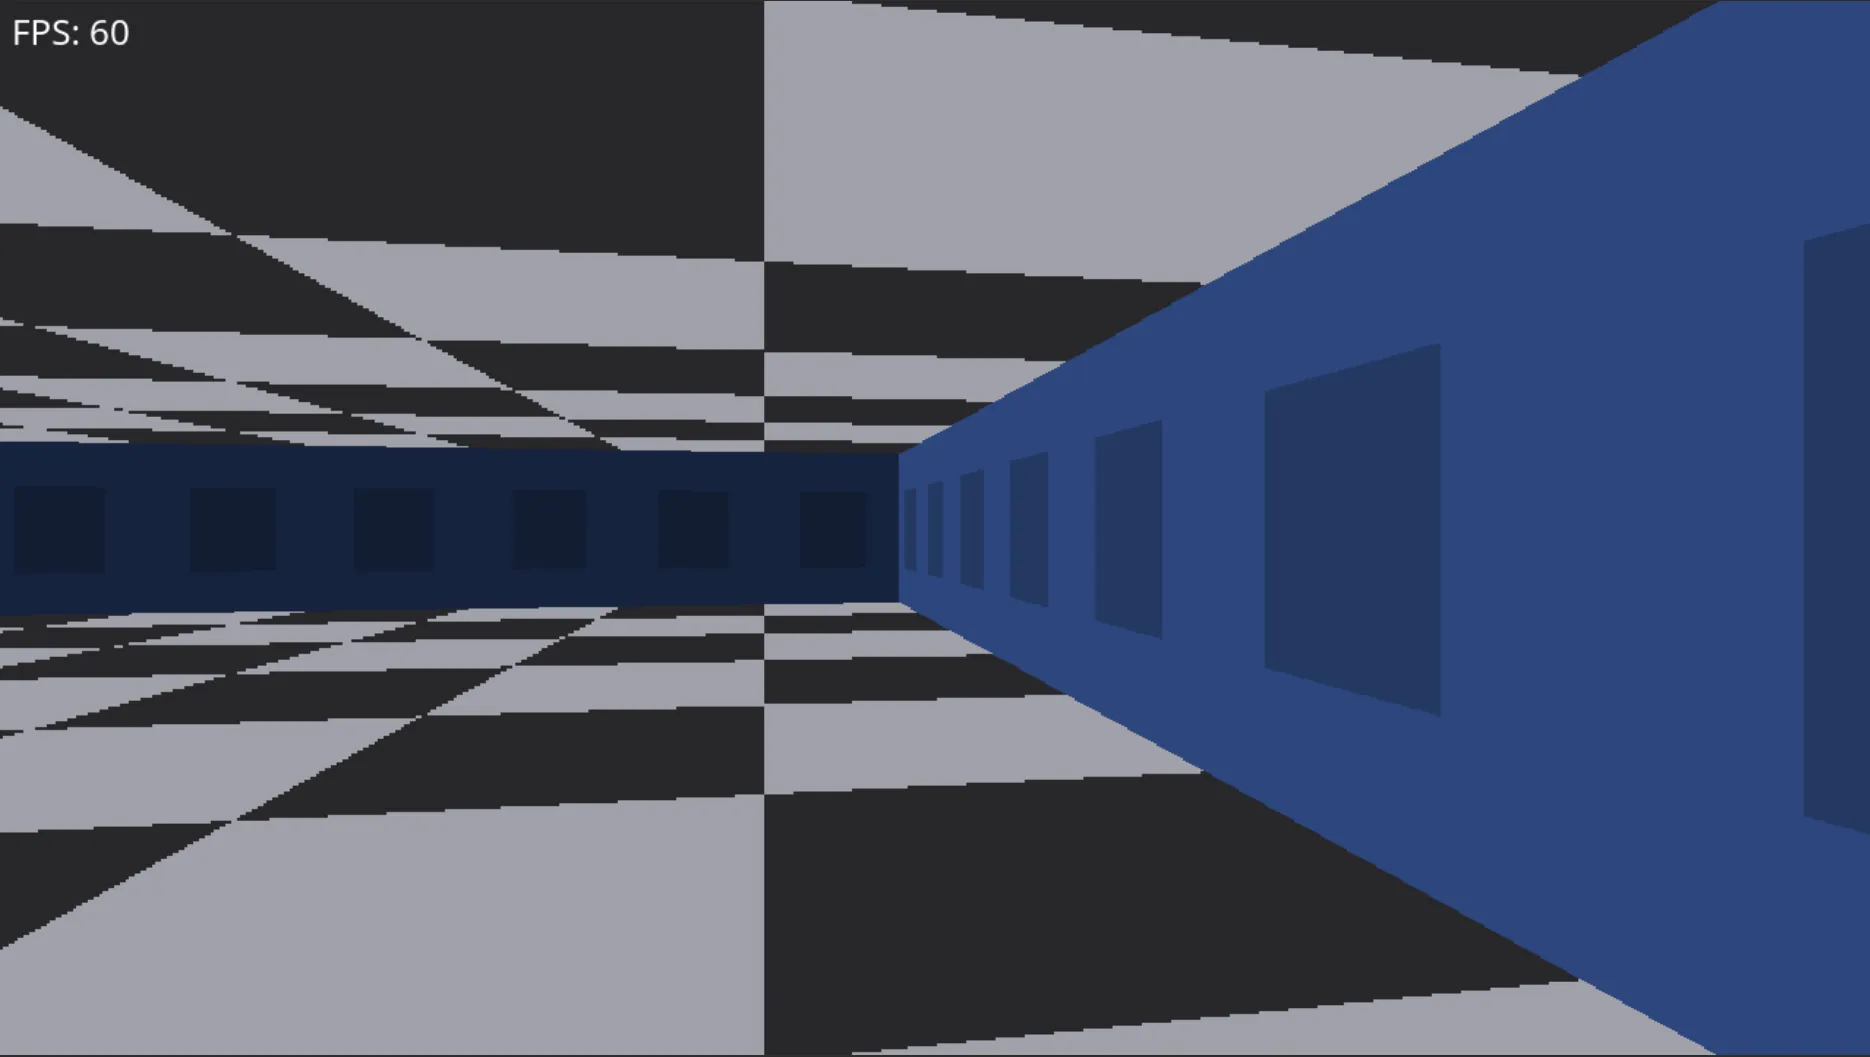
}To prove that the grid position is calculated correctly, let’s use position to generate a checkerboard pattern.
We can do this with the following simple snippet of code
const x_u = @as(usize, @intFromFloat(position.x));
const y_u = @as(usize, @intFromFloat(position.y));

var floor_color: Color = undefined;
var ceil_color: Color = undefined;
if ((x_u + y_u) % 2 == 0) {
  floor_color = Color.new(161, 161, 170);
  ceil_color = Color.new(39, 39, 42);
} else {
  floor_color = Color.new(39, 39, 42);
  ceil_color = Color.new(161, 161, 170);
}
The result that we get looks something like this.
Adding Textures
As stated before, adding textures is trivial now that we have the floor/ceiling tile position (position in
our code). Integer part represents the tile indices inside the map grid. We are already using that to determine
which color to render for the checkerboard pattern. Now we’ll use it to get the tile and with it floor and ceiling
textures.
The fraction part of the position vector represents coordinates inside the tile. Since all our coordinates are
positive, the fraction part is inside the interval and we can directly use it as texture coordinates.
Let’s first define an auxiliary function for getting the fraction part of a number.
fn fraction(val: f32) f32 {
    return val - @trunc(val);
}
With this function in place we can update the render_floor_ceil function to use textures instead of checkerboard pattern.
fn render_floor_ceil(game: *const Game, camera: Camera) void {
var y: usize = 0;
while (y < screen.height / 2) : (y += 1) {
// ...
var x: usize = 0;
while (x < screen.width) : (x += 1) {
// ...
const position = // ...
// Get tile on the map
if (position.x < 0 or position.y < 0) {
continue;
}
const tile = game.level.get_tile(
@intFromFloat(position.x),
@intFromFloat(position.y),
);
if (tile == null) {
continue;
}
// Get floor and ceiling color
var floor_color: Color = undefined;
var ceil_color: Color = undefined;
switch (tile.?) {
.empty => |empty| {
const text_x = fraction(position.x);
const text_y = fraction(position.y);
floor_color = empty.floor.get_pixel(text_x, text_y);
ceil_color = empty.ceiling.get_pixel(text_x, text_y);
},
.wall => {
continue;
},
}
screen.draw_pixel(x, screen.height - y - 1, floor_color);
screen.draw_pixel(x, y, ceil_color);
}
}
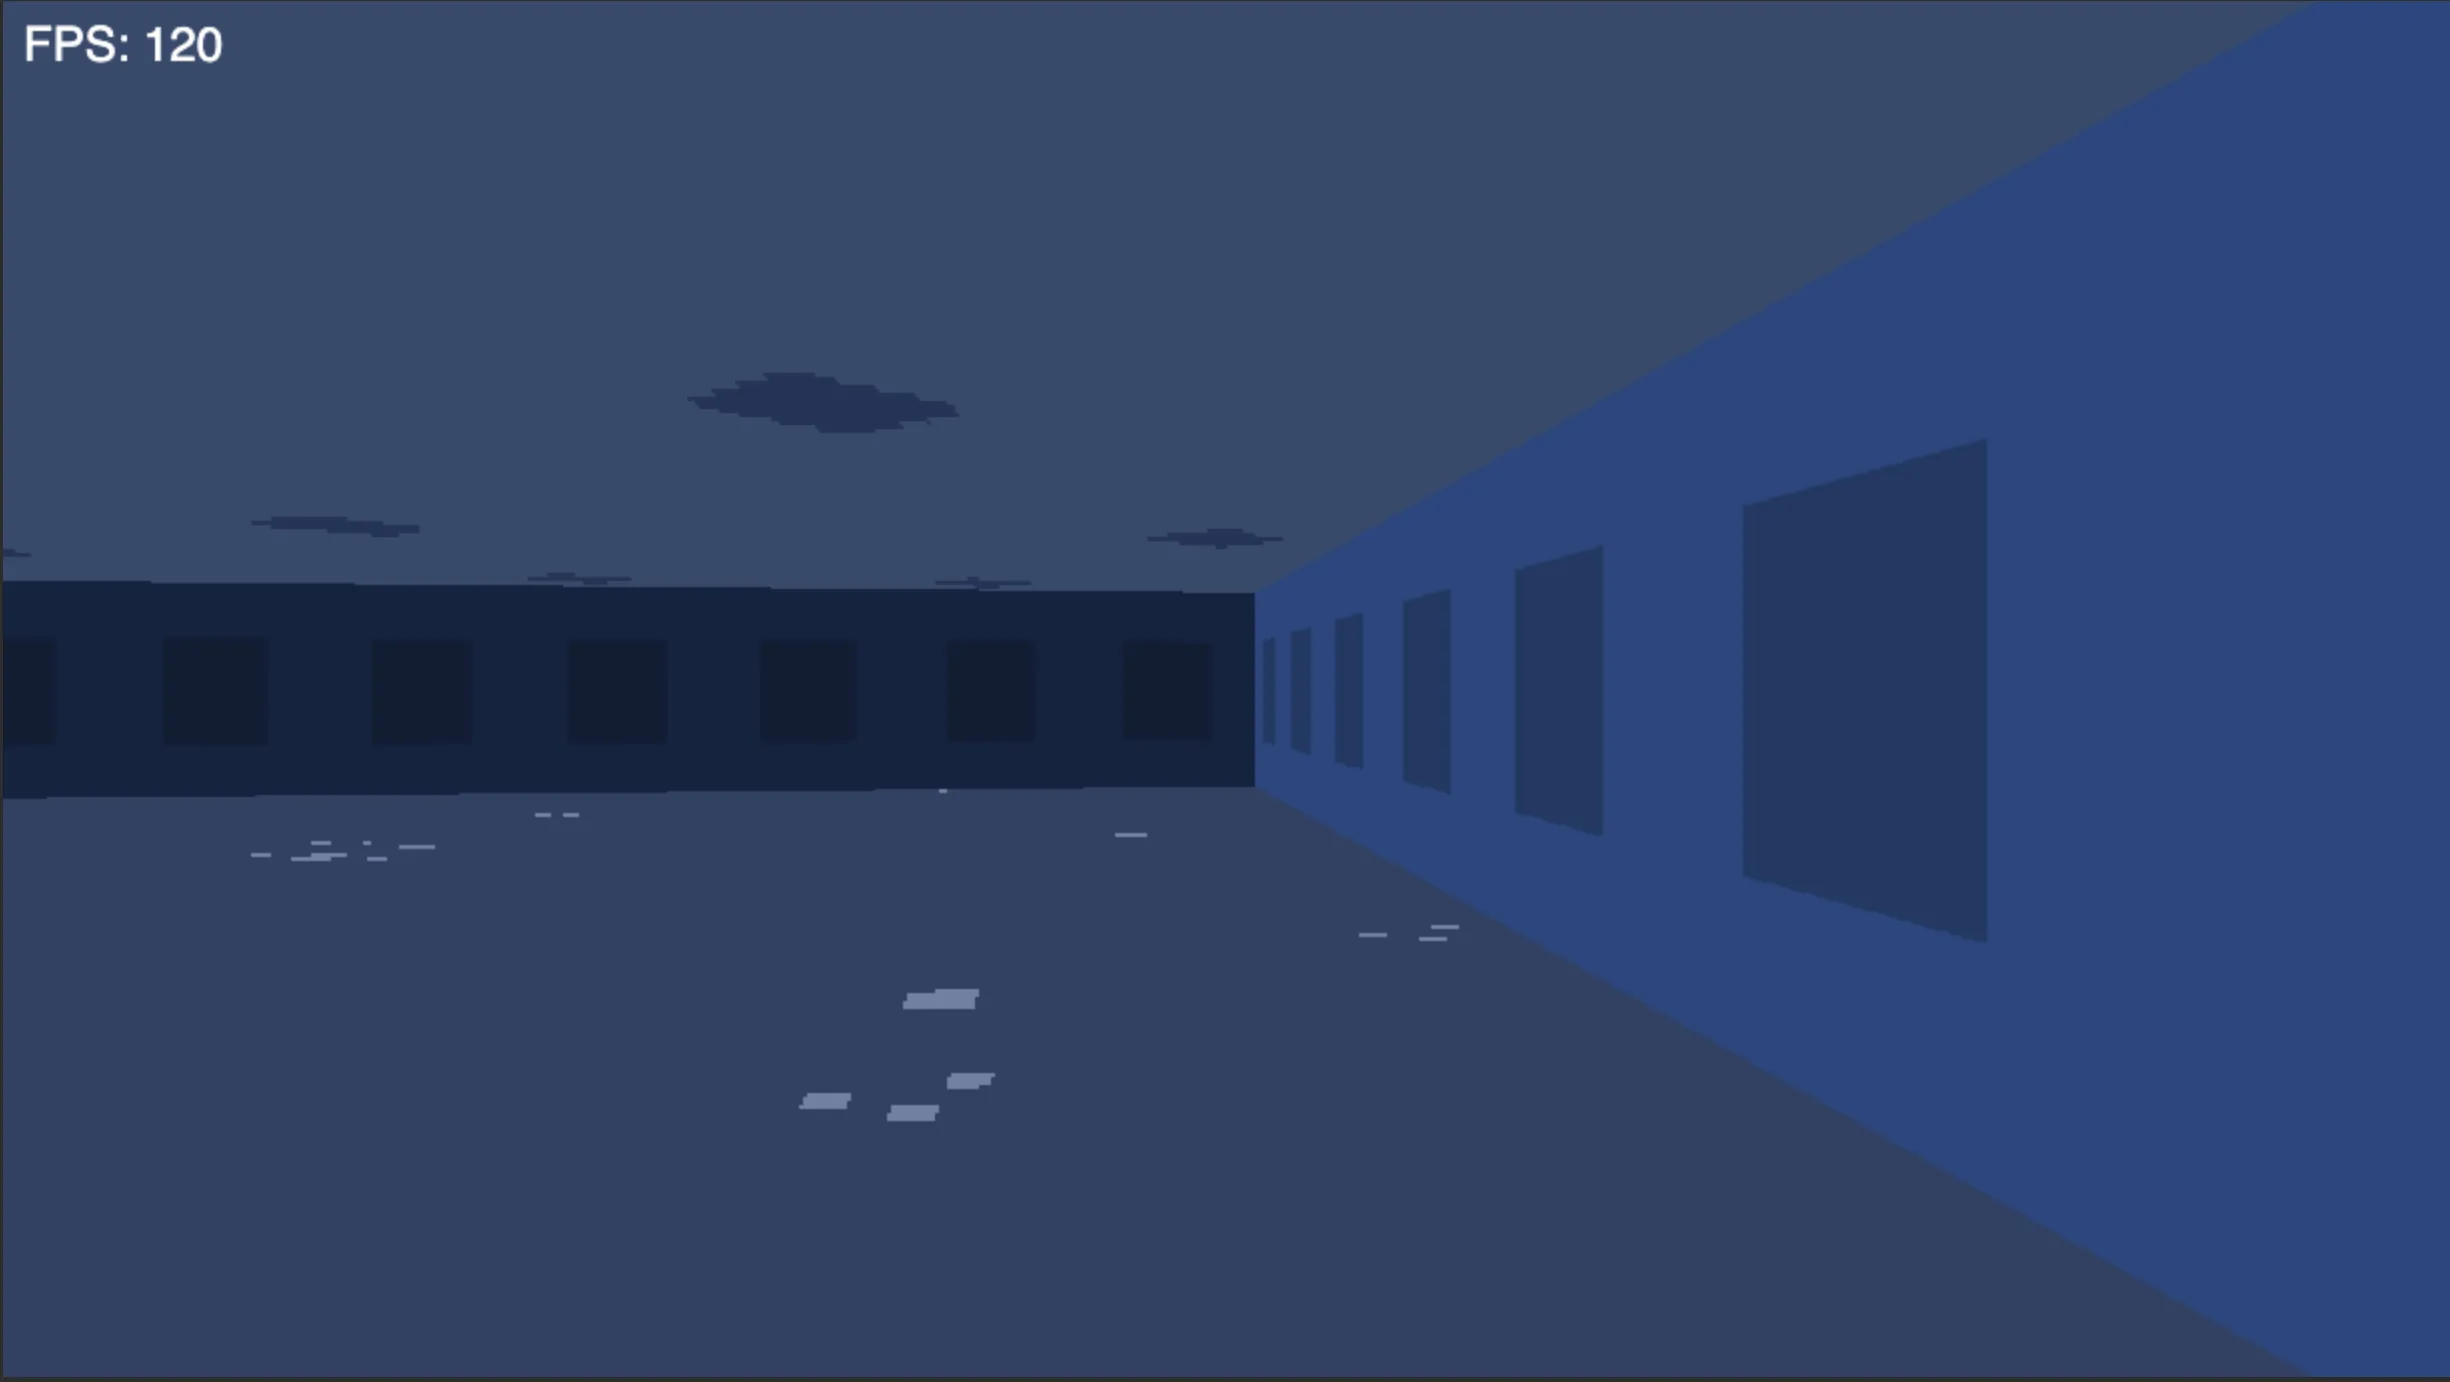
}The final result now looks something like this1.
Conclusion
Floor and ceiling rendering is now in place, and the game doesn’t look like it’s running in a void anymore. Once we have the grid position per pixel, everything else is bookkeeping: tile lookup, fractional coordinates, and sampling the right texture.
In the next part (yet to be written), we’ll implement rendering of the sprites. You can also take a look at the final result on my GitHub.
Footnotes
-
If the textures look ugly, it’s because I drew them myself. Obviously I am not very good at drawing :) ↩